How to efficiently and accurately add samples for rt-qPCR?
Rt-qPCR (real-time fluorescence quantitative PCR) is a basic experiment in molecular biology, which mainly includes three steps: RNA extraction, reverse transcription to cDNA, and real-time fluorescence quantitative PCR. Although it may seem that the reverse transcription experiment is just a matter of adding a few reagents to a centrifuge tube, mixing well, and then reacting, in actual practice, there are many details that require attention.
According to their different chemical principles, Rt-qPCR can be divided into two detection methods: one is the probe method, such as the TaqMan probe method; the other is the dye method, such as the SYBR Green Ⅰ dye method. Today, I'd like to share with you some tips for adding samples when performing an Rt-qPCR experiment (SYBR dye method), to help you add samples efficiently and accurately when performing an Rt-qPCR experiment!
01 Sample planning before loading
First, plan the positions of the 96-well plates according to the needs of the experiment. The experiment needs to meet the requirements of three technical replicates and at least three biological replicates.
Assuming that an experiment needs to detect the expression of three target genes in eight samples, the number of wells required is
8 (number of samples) × 4 (number of target genes + internal reference gene) × 3 (three technical replicates) = 96.
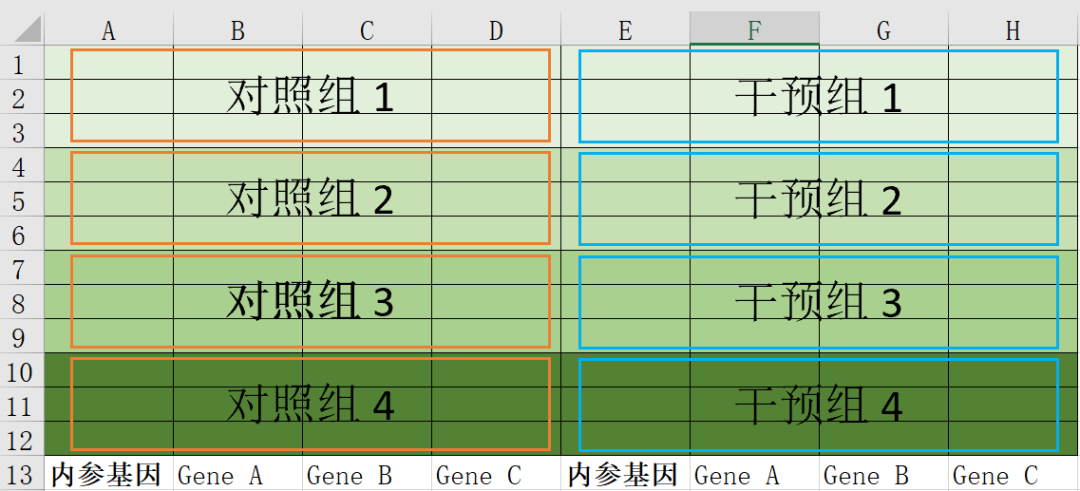
The following figure shows a schematic diagram of a 96-well plate (from top to bottom, A-H; from left to right, 1-12). Each large box (orange/blue) contains the same cDNA, and the A and E columns both contain primers for the internal reference gene. The three target genes (e.g., genes A, B, and C) are distributed as follows:
02 Prepare reagents and samples
Place the reagents required for the Rt-qPCR, such as enzyme-free water, SYBR, upstream and downstream primers, etc., and the sample (cDNA) on ice for later use.
03 Mix enzyme-free water, SYBR, and upstream and downstream primers
According to the above sample planning, calculate the number of wells for each primer location. For example, if the internal reference gene is sampled on columns A and E, 24 wells are required. Generally, 2 more wells are required when mixing. We will prepare the remaining system after dividing by 26 wells and dividing by the cDNA (1 μL).
Prepare an EP tube and follow the kit instructions (this is the sample loading system for the Takara kit, a total of 20 μL). Calculate separately:
Enzyme-free water: 7.4 μL × 26 = 192.4 μL
SYBR: 10 μL × 26 = 260 μL
Upstream and downstream primers each: 0.8 μL × 26 = 20.8 μL
Total volume of 26-well mixture: 19 μL × 26 = 494 μL = 260 μL + 20.8 × 2 μL + 192.4 μL
Mix thoroughly and set aside on ice. Prepare the mixtures containing the target genes in the same way.
04 Sample loading
First sample loading: Add the above mixtures to the corresponding wells according to the sample loading plan, for example, add 19 μL of the mixture containing the internal reference gene to both column A and column E.
Tips: Add each time to the bottom of the well, without changing the tip, and then change it when adding the mixture containing the other primer.
Second sample loading: Add 1 μL of cDNA to each well.
Tips: To avoid contamination, you need to change the tip each time.
To improve the accuracy of sample loading, two tips for sample loading:
① First, plan the positions of the 96-well plates according to the needs of the experiment, and the experiment needs to meet the requirements of 3 technical replicates and at least 3 biological replicates.
② Prepare a complete 10 μL enzyme-free tip box, and take the tips according to the positions of the 96-well plate to avoid sample loading errors.
05 Loading
After the sample is loaded, attach the sealing film and centrifuge (remember to centrifuge!!! Otherwise, the experiment will not react without a substrate or the mixture will not be uniform, and the results will be different). Mix the system thoroughly before loading. If the experiment cannot be loaded in time due to force majeure, the 96-well plate must be stored at 4°C away from light (we have personally tested that the results will not be affected if the experiment is loaded after being stored at 4°C for about 4 hours).
The above are the sample addition techniques for Rt-qPCR experiments that I would like to share with you, hoping to help you complete the experiment more smoothly.
For more product details, please visit Aladdin Scientific website.